Do you have every desire to become a black belt Microsoft Word ninja? Or do you just want to get rid of the hassle of text editing faster than ever before? Here are some very useful tips.
You can get used to it or you can hate it, but the fact is that Microsoft Word has been with us for more than 40 years, and it doesn’t look like it will fade away from our everyday lives anytime soon. Despite artificial intelligence, online services and content production moving in the audiovisual direction, the age-old text editor is still used by many people.
There is a traditional, one-time purchase version, a subscription version within the framework of Microsoft 365, a mobile app, or it can even be used online for free after a quick registration.
What is the same, however, is the familiar interface, the basic functions, and of course the many, many nags, which almost every user has horror stories about. A typical nightmare is the insertion of images into the document, which causes the formatted text to completely fall apart, the halved spelling check, the sliding page numbering, the header and footer that often come to life on their own, and we could go on and on. In our article, we show tricks – known to very few people – that help make handling Word much more efficient. You may not have used these services much until now, but believe me, it is worth trying them out, because they can significantly simplify your everyday life so that you can prepare your documents as quickly and simply as possible. For our article, we used the latest version of Microsoft Word under Windows 11, but most of the tricks are available in older, online and MacOS versions.
Rearrange your document – with one click!
Subheadings, main chapters, lists, etc. can easily become opaque, especially in the case of larger documents. This is especially painful when you no longer need to rewrite a section, but you need to rearrange, for example, the order, formatting, etc. In this case, the sketch view comes into play, which you can activate with the View/Sketch button on the thick Menu ribbon.
If you click on this, the text parts will be smaller, and the entire document will be seen almost from a bird’s eye view, where you can close complete paragraphs for the sake of simplicity, and then move them, resize them, move them to an inner level, etc. If you work with large files, this view will be your best friend, in which you can restructure a long text in a few minutes. Be careful, however, that the Draft view has been adapted specifically to the texts, you will have to adjust the images again afterwards. If something goes wrong, no problem, you can step back according to the command. When you’re done, check the print image to see if the result is what you wanted.
Let Word do the math for you
Would you like to write the text, but you have to constantly stop and calculate sums, percentages, averages, and then transcribe them in the specified parts of what you have to say? Don’t bother with these, don’t search for the Calculator and switch windows, use Word’s math skills instead! Of course, there is no functionality similar to Excel here, but you can transfer these simpler operations to the program, which calculates everything in real time with a single click or even pressing a hotkey.
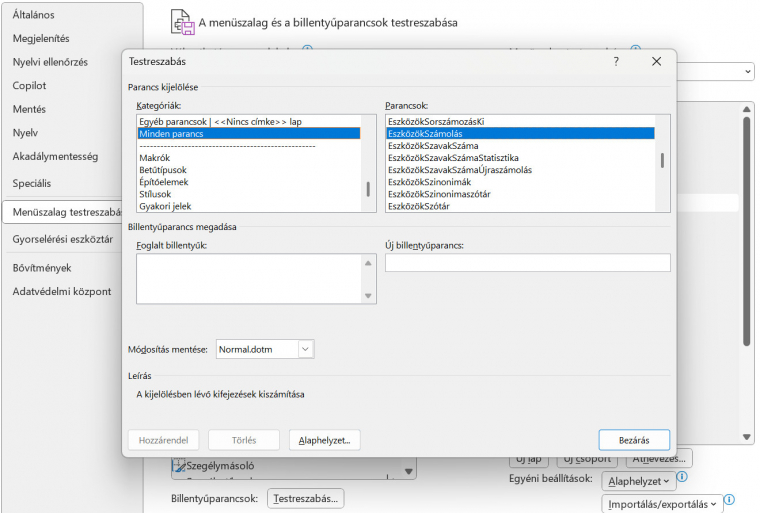
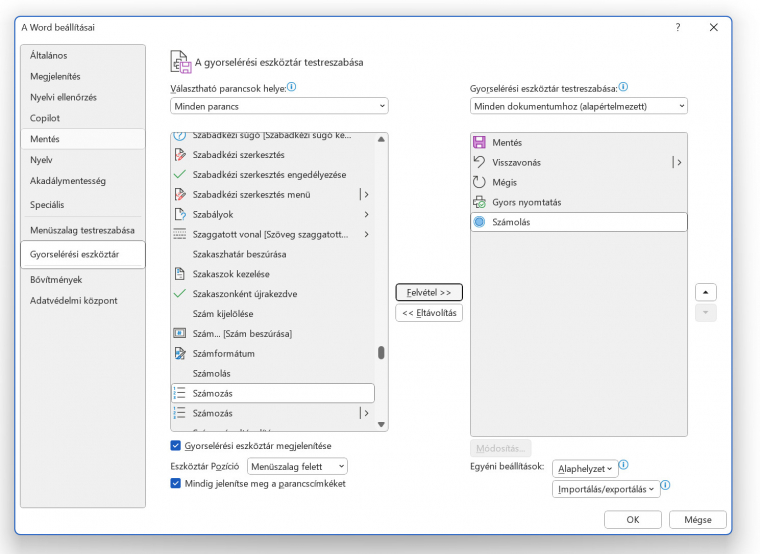
To apply this, select edit the Quick Access toolbar with mini icons visible in the upper left corner (Additional commands), filter the list on the left to All commands, then select Count and move it to the right. As a result, a small blue dot appears in the top row of icons. When you select a mathematical operation in your text and then press this dot, you will get the result in the lower bar of the Word window. If you want to simplify the process even more, you can also assign a hotkey. This is the File\Settings\Customize the Ribbon\Keyboard Commands-Customize\All Commands\ToolsCount you can do it by route. Here you can enter any key combination for immediate calculation. Unfortunately, this is not available for the MacOS version.
Cut out and collect the pieces of text
Microsoft has also equipped Word with some secret weapons. One of these is Spike, which is a mystery why it is not more prominent, since it can be useful to anyone. With its help, you can cut out parts of the text from anywhere, collect them together, and then paste them together in a place you designate. This is not a substitute for the Clipboard, which can cut and store and paste elements one by one, separately from each other. With Spike, you can easily join parts that belong to each other and, for example, rearrange your document with a few clicks of a button.
No special activation is required to use Spike, just select the text section and press CTRL+F3 (CMD+Fn+F3 on Mac). This selects the selected text and adds it to Spike’s list. Once you’re done collecting, navigate to where you want to paste the cut and collected parts, then press CTRL+SHIFT+F3 to have Spike paste the text.
After pasting, the Spike list is deleted, meaning you can start a new Spike collection. It takes some learning to use, but once you get the hang of it, it can be a huge help, although it wouldn’t hurt to be able to look at Spike’s list before pasting.
Screen saver embedded directly in the document
It is a common task to illustrate your text document with an image save. It can be a part of a website, a window of a program, etc. There is a Windows version of this, where you can save it using the Image Cutter and then paste it from the Clipboard, but there is an even simpler solution, for which you don’t even have to leave the Word window!
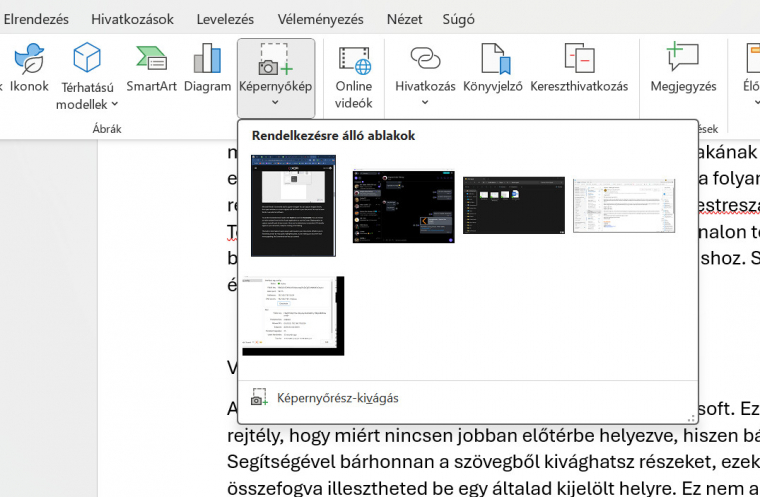
To use the Save Image function, navigate to the Insert menu on the Ribbon toolbar, then select the Screenshot icon. In a pop-up window, you can immediately see the windows of the programs currently running in the background: choose the one you need from among them, so Word will already insert the image of the selected software at the cursor position. If you only need a section, click the Cut screen section line, so the Word window will be minimized to the Taskbar so that you can cut out the desired section. You can modify, cut, and mark the already pasted image as you like within the Word document.
Translation on the fly
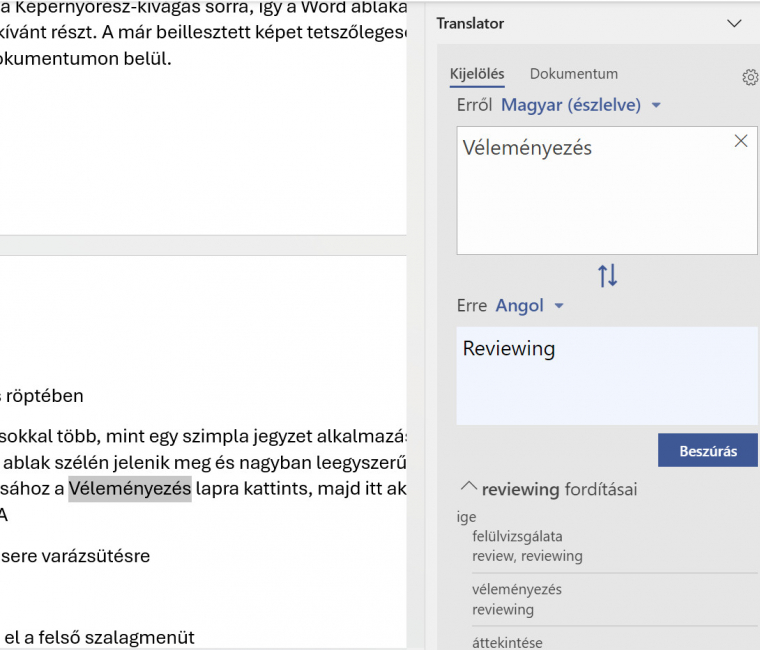
Word is much more than a simple note application – for example, you can find a translation module in it. It appears on the edge of the window and greatly simplifies multilingual communication. To activate it, click on the Review tab, then activate the Translation\Translate selected part panel here. As a result, Word translates all selected parts immediately, in real time, for this you do not need to click on an extra button, you only have to navigate here if you accept the offered translation and want to paste it one by one. By default, the Translator module starts with automatic language recognition, but you can change this at any time, and you can also select which language to translate into. If you switch to the Document tab on the same panel, you can have your entire document translated with Word. In this case, the new text appears in a new Word window.
Change date magically
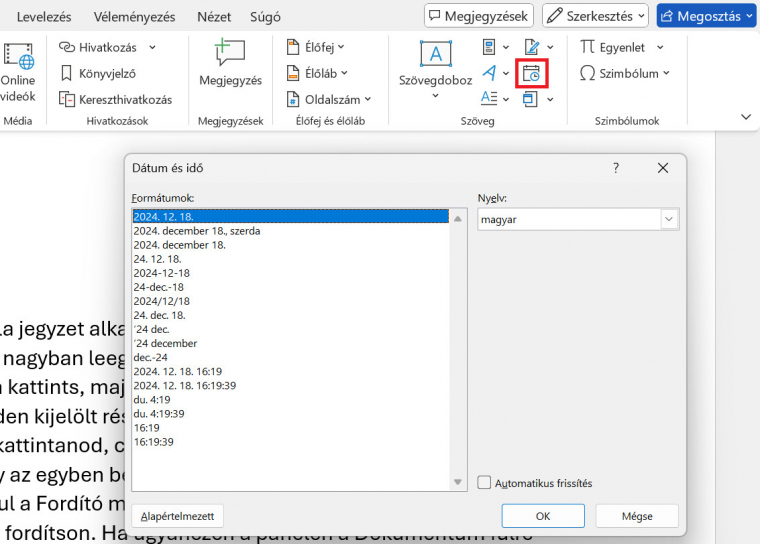
Do you need to fill your text with dates? This is not a problem, the problem is if you only submit the text not on the same day, but even a few days later – in this case, you first have to scroll through and manually rewrite each date. Or, instead, you can use Word’s built-in dynamic date feature, which will take care of automatic updates. To do this, select the Date and time command, 2024, from the Insert point on the Ribbon. 12. 29. enter the desired format and be sure to activate Automatic update in the lower right corner of the window.
Remove the top ribbon menu
In fact, you can find all of Word’s functions on the Ribbon, grouped together in an easily transparent manner, which makes managing the program much easier. At the same time, there are situations when the thick ribbon in the Word window is not practical, rather confusing. This is particularly useful when you are typing a longer text and you do not really need formatting or special content elements, or you have created a shortcut for those that you use often.
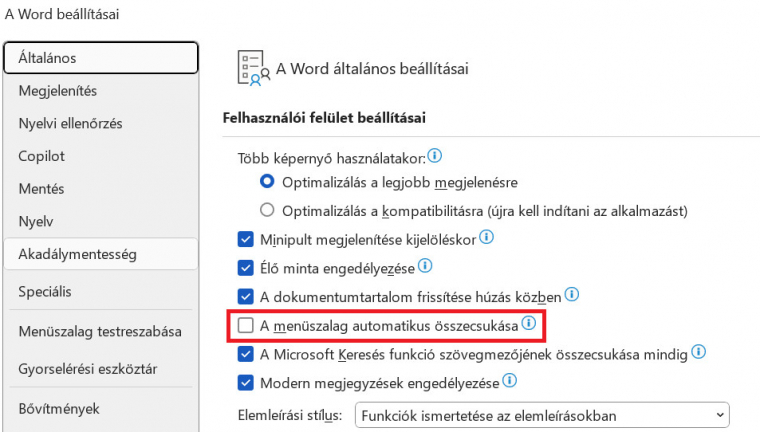
You can also hide the Ribbon menu by clicking on the down arrow in the lower right corner. In Windows, you can also set when the ribbon should appear and when it should be hidden. To do this, in File\Settings\General, activate the Automatically collapse the Ribbon option. The names of the main points of the ribbon menu remain visible in this case as well, and if you click on one of them, the ribbon appears, but it no longer takes up space unnecessarily.
Hidden message in the document
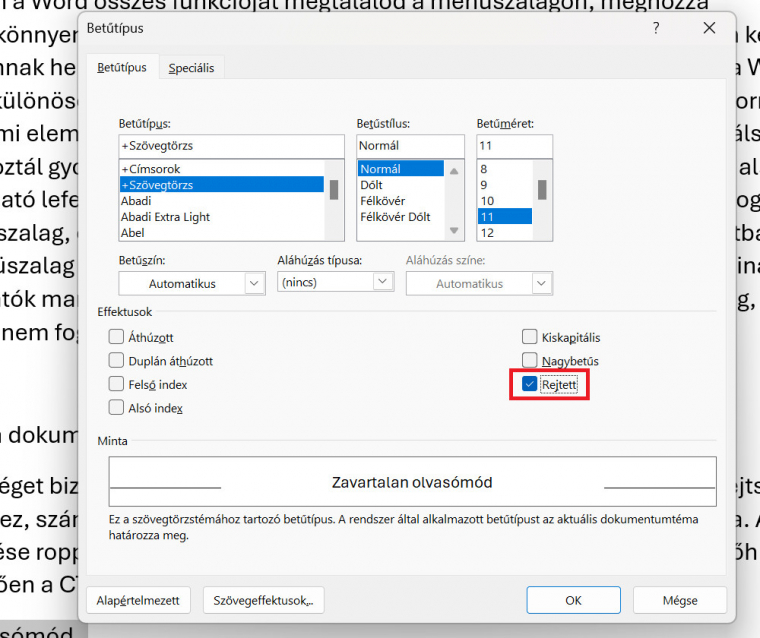
Word allows you to hide certain text sections instead of deleting them. This can be used during question-and-answer sessions in preparation for comments and debriefing. Hiding the texts is very simple, for this you need to call up the property panel of the selected part. After selection, open the Font settings panel with CTRL+D and select the Hidden option there. As a result, the text disappears completely (it does not take up any space in the document), but it can be easily brought back as soon as it is needed. To reveal, click the Show All button in the Home\Paragraph section of the ribbon menu, which will reveal all control characters and hidden elements in the document. You should keep in mind that when printing, the hidden text parts do not appear in the printed document, for this you have to reveal them first (reset their attribute from hidden to visible).
Disturbed reading
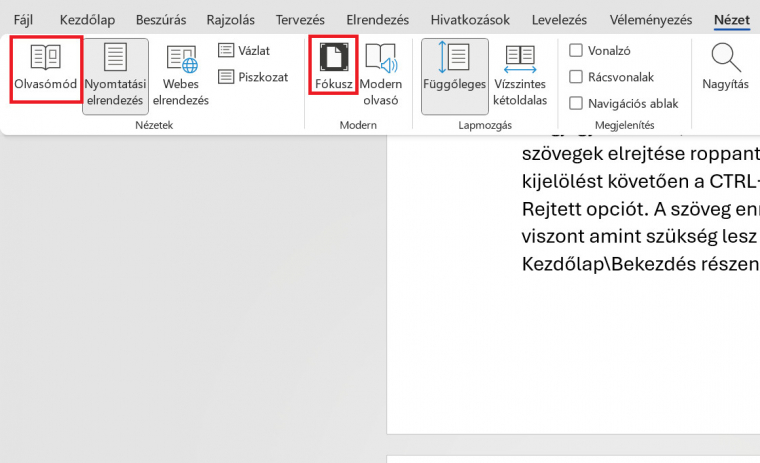
You can not only write and create content in Word, we often use it to read through a text. When it’s longer, complicated, and requires our full, undivided attention, it’s better to have nothing to distract us. In addition to the fact that you can set a focus time in Windows, when the system silences all notifications, you can also hide the Word interface. You can activate this in View\Reading mode. As a result, the entire upper part of the Word window disappears, editing is no longer possible, and when scrolling, Word takes into account the easiest readability. Even the paging effect changes, you can go to the next page with an animation somewhat similar to that of a traditional printed book. In addition to the view from the top menu bar, the Search and Translate options remain, and you can request different highlighting for the selected text from the local quick menu. If you want to keep the editing function, but really want a book-like interface, free of all distracting menus, choose the Focus mode, which shows the given document in full screen.
Override the default font
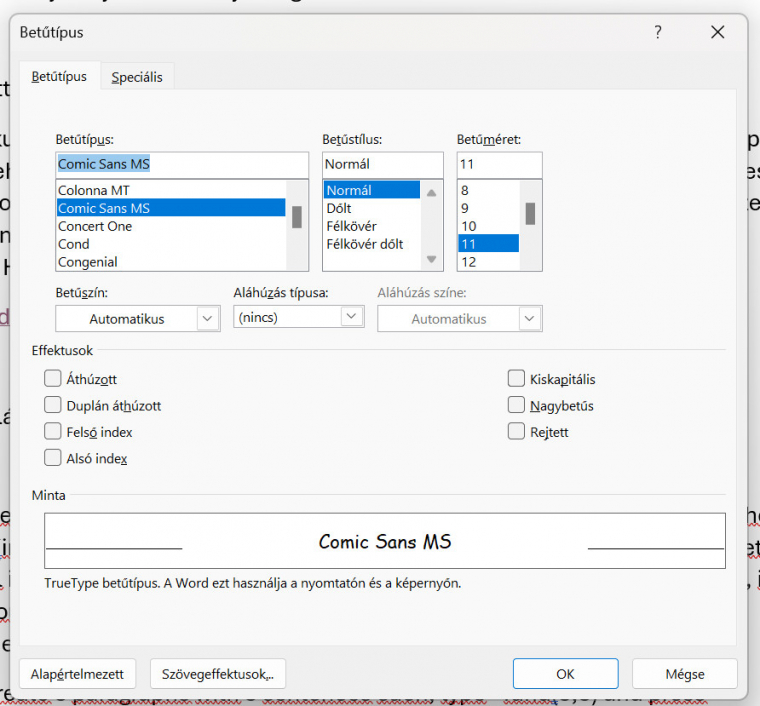
Each of your documents can be completely unique – for example, you can write with the font you find best and make it the default, so that you don’t have to change Microsoft’s default for each new document one by one. To do this, click the down arrow in the lower right corner of the Font section on the Home tab of the Ribbon to access the font settings panel. If you prefer to use a key combination, press CTRL+Dt. Here, select the font you like best from the list, set the size and style, and finally click the Default button in the lower left corner of the window. In the pop-up window, choose the second option (in all documents based on the Normal.dotm template), so that this setting will be the default in all your newly opened documents.
+1: Text generation in Word
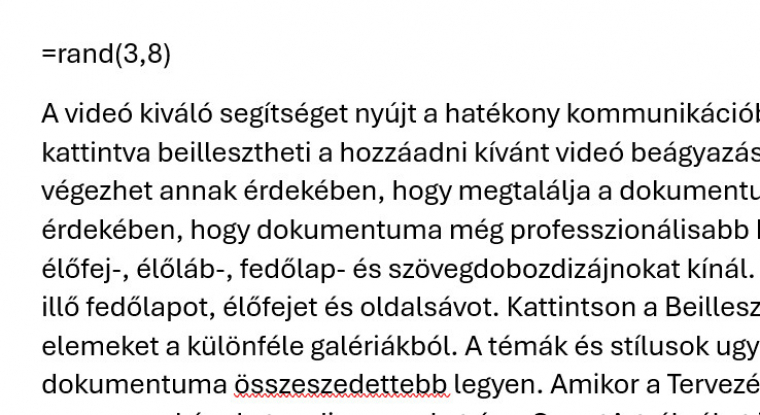
It may be good from a formatting point of view to have some temporary padding text in some parts of your document. You don’t need to hit the keyboard like crazy, Word can automatically generate filler text of any length. All you have to do is type the following command where you want to place the text:
=rand(number of paragraphs, number of sentences)
then press Enter at the end of the line. As a result, Word fills the given place with Hungarian, meaningful text. The length and wrapping of the text depends on how many paragraphs and how many sentences per paragraph you requested.
Source: www.pcwplus.hu


